Tuesday, August 1, 2023

Easiest Ever Coconut Flour Banana Bread Bars

I'm trying not to eat very much white flour and sugar these days. But it's still fun to have a treat from time to time. Enter the Coconut Flour Banana Bread Bars. A super simple non-fussy recipe that you whip up and have in the oven in no time flat!! 


This Coconut Flour Banana Bread recipe is:

  • Gluten-free and grain-free
  • Naturally sweetened, with the option of using NO added sugar if you prefer
  • Oil-free
  • Nut-free 
  • Fast to prepare! The batter can be ready in just 10 minutes before baking it.
  • Higher in protein
  • Super-moist and delicious!
You couldn't ask for an easier recipe! Since they are super-moist I prefer to eat them chilled because it firms them up. Otherwise, it's super similar (I think) to banana bread made with flour. 

INGREDIENTS

3 very ripe bananas 
3/4 cup coconut flour 
5 large eggs 
5 tablespoons coconut sugar (optional)
1 teaspoon ground cinnamon 
1 teaspoon baking soda 
1 teaspoon baking powder 
1/4 teaspoon fine sea salt 
1 teaspoon vanilla extract 
1 tablespoon apple cider vinegar

INSTRUCTIONS 

1 - Preheat the oven to 350ΒΊF and line a square  9 x 9 cake pan with parchment paper.

2 - In a large bowl, mash the bananas with a fork. Add in the coconut flour, eggs, coconut sugar, cinnamon, baking soda, baking powder, salt, vanilla, and apple cider vinegar. Use a whisk to stir the batter well, breaking up any lumps so a smooth batter is formed. (You can also use an electric hand or stand mixer to do this which is my preferred method.)

3 - Pour the batter into the lined cake pan, smooth the batter so it is level in the pan and bake until the center of the loaf has risen, feeling firm to the touch, 30 minutes. Cool completely before slicing and serving.

4 - Because this loaf is moist, be sure to store it in an airtight container in the fridge for best shelf life. It should last at least a week when stored in the fridge, though you might eat it all before then!

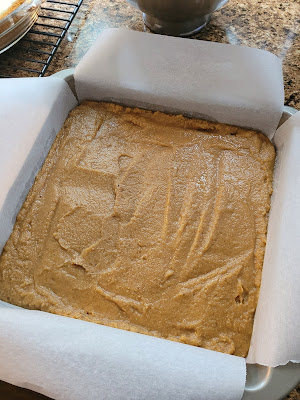
The batter is thick so you'll have to spread it into your pan corners! 


Ready for the oven! 


30 minutes later! 


Sliced and ready for snacking! 


The perfect anytime treat! 


Sunday, January 1, 2023

Happy New Year - 2023

We took advantage of the beautiful weather today and spent some time in the woods!! 
Just for fun the kids stood on part of the frozen lake. 😊
Happy New Year!! Wishing health & happiness to each one of you in 2023!! ❤️

Thursday, September 15, 2022

Levi Is Off To 4th Grade

The summer flew by and Levi is back in school. This time a 4th grader!! 


Little sis πŸ’—

Away he goes!! 

Sunday, August 21, 2022

Take Me Out To The Ball Game 2022

 It's been years since we've made it to a baseball game. Baseball is really the only sport Mike follows so he's been wanting to get to a game for awhile now. Since the O's have been playing decent lately we decided to head to Camden Yards and watch a game. Getting to our parking destination was a little rough (always a transition when you are driving in the city). But we ended up landing in Parking Lot C which couldn't have been more perfect!

It was Lexi's first baseball game and I think she had a good time. For the record she did make a million trips to the bathroom. That being said, I think she sat better than a bunch of adults in the rows around us. Our seats were perfect and she was able to stretch her legs and wiggle around as much as she needed to. Which was a lot! The O's played Boston Red Sox and unfortunately ended up losing 4 to 3. We still had a lot of fun and look forward to going to another game sometime soon! 


What happens when you take Lexi out past her bedtime.


Easiest Pour Over Iced Coffee

To say we have a coffee addiction at our house is an understatement. Up until this year I just couldn't figure out an easy way to make iced coffee quickly. But this year it happened, and now I'm making this on a daily basis using the pour over method. All it takes is a few simple supplies and you are ready to go! 


 Supply List:


Ingredients: 
  • 4 tablespoons of dark roast/espresso style coffee
  • 10 ounces of water
  • 2 cups of ice 

Instructions: 

Place your 2 cups of ice in your coffee tumbler and place the pour over coffee dripper on the top of the tumbler. Heat your 10 ounces of water until just boiling. Pour a small amount of water over your coffee grounds to just dampen them and wait 30 to 45 seconds to allow your coffee to bloom. After allowing your coffee to bloom, slowly pour the rest of the water over your coffee grounds and let it drip over your ice. Once all your water has dripped through your ICED coffee is immediately ready to drink! 

We add some half and half to our iced coffee but I'm sure you can add a sugar syrup or flavored creamer to your preferred taste. Depending on the roast of coffee used the final product is comparable to a Dunkin or Starbucks iced coffee. 

Coffee prep!


Ready for hot water! 


Grounds dampened and allowed to bloom!


Slowly pouring in the rest of the hot water!


Allowing the coffee to drip through over the ice!


Iced coffee ready to drink!


Enjoy! And let me know if you try this and how it turned out for you!


Thursday, August 18, 2022

A Walk In The Woods

Last Friday evening the weather was so beautiful that we headed out to Cowans Gap to walk around the lake. 


He told me this was his happy face. πŸ˜†


These are the moments I don't want to forget... ❤️


Saturday, April 25, 2020

Berry Buttermilk Cake Recipe

Breaking my really long blogging fast with this Berry Buttermilk Cake recipe!!


This berry buttermilk cake is light and tender, with jammy berries, a crunchy top, and all the flavors of spring. 
Prep Time: 20 mins Cook Time: 25 mins Total Time: 45 mins
Servings: One 9-inch cake
Ingredients
·       4 tablespoons (1/2 stick) unsalted butter, softened to room temperature
·         2/3 cup granulated sugar
·         1 large egg
·         1/2 teaspoon vanilla extract
·         Zest of 1 lemon (about 1 teaspoon)
·         1 cup all-purpose flour
·         1/2 teaspoon baking powder
·         1/2 teaspoon baking soda
·         1/4 teaspoon salt
·         1/2 cup buttermilk*
·         1 heaping cup mixed berries (I used strawberries, blueberries, and blackberries)
·         1 1/2 tablespoons granulated sugar , for topping
Instructions
Preheat oven to 400 degrees F. Generously grease a 9-inch round cake pan, line with parchment paper and set aside.
In a large bowl, beat softened butter and sugar together with a hand mixer or stand mixer at medium-high speed until light and fluffy, 2-3 minutes. This will take longer than you think it should - keep going until it's quite pale in color.
Beat in the egg at medium speed until fully combined, then beat in almond extract and lemon zest.
Add dry ingredients. Mix just until combined each time - don't over mix. The batter will be thick.
Scoop the batter into the cake pan, and spread it out evenly. Arrange the berries evenly scattered over top of the batter. Sprinkle the 1 1/2 tablespoons of granulated sugar over top. Don't skip this step - it produces a lovely crunch when baked!
Bake until cake is golden brown on top and a toothpick inserted in the center comes out clean, 22-25 minutes. Mine needed 25 - watch carefully, as my toothpick came out wet at 23 minutes but clean at 25!
Cool for 20 minutes in pan, then run a knife along the edges and invert onto a cooling rack or plate to cool completely. Note you'll actually have to invert it 2 times - once upside-down onto a rack, and then back upright again onto another rack or plate.
Serve cooled cake dusted with powdered sugar or topped with whipped cream!
Notes
*If you don't have buttermilk on hand, just put 1/2 Tablespoon lemon juice or vinegar into a measuring cup, and add regular milk until it measures 1/2 cup.  Stir and let sit for 5 minutes - homemade buttermilk!
Adapted from Gourmet magazine via Epicurious.